 |
| Rosemary Onion Bread |
I've taken my bread making to a new level and couldn't be more thrilled. If you've been reading my blog from the beginning, you know that I've always been a little hesitant about working with yeast. But, I made it through the cinnamon rolls. And then I conquered pizza dough (I need to give you my new recipe for that. It has changed dramatically since I first posted it). I've tried my hand at rolls a few times, those will make the blog eventually too. But today I want to share my first attempt at a loaf bread with you.
 |
| Can you tell I have nieces? |
Rosemary Onion Bread
recipe source: Foy Update
Ingredients:
1 cup warm water
2.5 teaspoons yeast
1.5 tablespoons brown sugar or honey (I used honey both times)
1 teaspoon salt
2 tablespoons butter
1 tablespoon fresh rosemary
1 green onion (scallion)
~3 ½ cups flour (I used three cups both times)
2.5 teaspoons yeast
1.5 tablespoons brown sugar or honey (I used honey both times)
1 teaspoon salt
2 tablespoons butter
1 tablespoon fresh rosemary
1 green onion (scallion)
~3 ½ cups flour (I used three cups both times)
 |
| I have much more onion than the original recipe. |
Method:
Pour the cup of warm water into a large bowl. The water should be about 115°F, about the temperature of a nice bath. Add the brown sugar or honey and stir to dissolve. Then sprinkle the yeast on top. Cover the bowl with a towel and allow the yeast to bloom for about five minutes.
Meanwhile, mince the green onions and rosemary. I put the salt, rosemary and onion in a mortar and use the kitchen shears to chop right into the bowl. It's a handy way to save on dishes because the next step is to bruise the rosemary and scallions. Give them a good grind in the mortar with the pestle. Crushing the leaves allows all the savory oils to come out. This is the same technique used to make authentic pesto. (I don't have a mortar and pestle, so I put my herbs in a little baggie and bruised the herbs with the bottom of a glass. It worked beautifully.)
To further increase the potency mix the herbs and butter together. This will infuse the savory flavors into the butter. Scrape the herbs out of the mortar and into a microwave safe dish. Add the butter and microwave for 15-30 seconds or until the butter just liquefies. Stir until everything together.
Check on your yeast to make sure it has bloomed. The water should now be covered in a thin layer of frothy foam. Using a wooden spoon, stir in the salt and one cup of flour. Once the herb infused butter is cool enough to touch add it to the yeast mixture.
Continue stirring in the flour a half cup at a time until the dough is really hard to mix. Then use your clean hands to knead the dough. I like to knead right in the bowl or you can turn it out on to the counter.
Knead for about five minutes until the dough is elastic and still a little sticky.
Pour a little oil into a large clean bowl, place the ball of dough into the bowl and turn it to grease all sides. Then cover with a towel and allow to rise in a warm place until double. Depending on how warm your place is this could take thirty minutes to an hour.
Preheat the oven to 375 degrees F. Generously grease the bread pan. I use a standard loaf pan, but you could use a 9" round or even a cookie sheet if you want a more free-form loaf.
Punch the dough down and turn it out on to a clean work surface. Roll out the dough into a 10 inch by 20 inch rectangle. It doesn't have to be exact. Roll the dough up lengthwise so you have a 10 inch log of dough. Then tuck the open ends under and lay the dough seam-side down in your greased pan. Allow the dough to raise for second time until double. This rise will go quicker; fifteen minutes to a half hour is all it should take.
Bake your loaf for 30-45 minutes or until the top starts to brown. When you turn your loaf out the sides and bottom should be a rich golden color, if they aren't put your loaf back in the oven for another five minutes or so. It's very disappointing to cut into a loaf only to find the middle is still doughy.
Once you've achieved the lovely golden brown, turn the finished loaf out on to a cooling rack. This keeps moisture from condensing in the pan and making the crust soggy. Allow the rosemary onion bread to cool at least five minutes before you slice into it. Try not to eat the whole loaf in one sitting!
If you need to store it overnight, allow the bread to cool completely, then wrap it in wax paper and place it in a large resealable plastic bag. Enjoy!
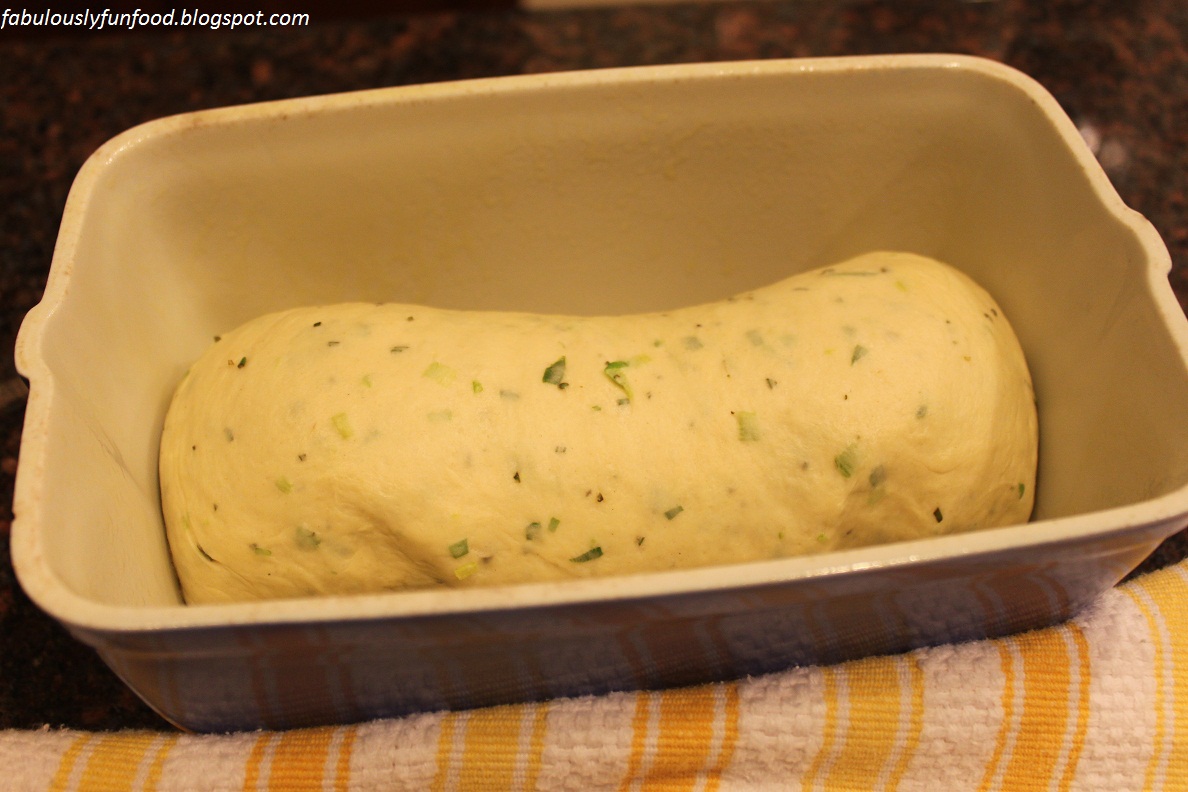 |
| Just before the second rise. |
THOUGHTS:
Yay! I made loaf bread and it was good. The Rosemary Onion Bread version I made was quite flavorful. Hrm, actually it was a bit too flavorful. When I compared my pictures to the original, I realized where the problem came from: I had way too much onion. The original recipe called for 3-4 green onions, but I've reduced that it this recipe to give you a more balanced bread.
My second version of this bread was made with no herbs and was half whole wheat. It was a gift for family, but once I hear how it turned out, I'll let you know.
VERDICT:
Whoa-that-bread-is-too-powerful-for-me: 1 vote
It's-very-well-made-for-a-loaf-bread-but-I-don't-like-the-flavorings: 1 vote
Yum: 2 votes!
To see Tabitha's spin on her Rosemary Onion Bread, head on over to Double the Garlic!
 |
| Look! I made a loaf of bread! |
Yay for gaining confidence with loaf bread!
ReplyDeleteYay for my Grandmother's Loaf pan making your blog! They were beautiful loaves of bread!
ReplyDelete