28 January 2013

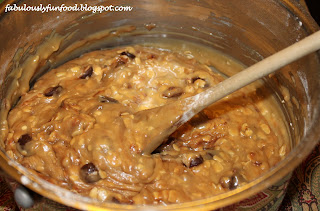
January Secret Recipe Club: Chocolate Chip and Heath Bit Oatmeal Jumbles (Cookies)

Cookies!!


The end of January is upon us. It's the season of birthdays, and that calls for cookies! You all know how much I love cookies, so that is exactly what I went looking for when I got my January Secret Recipe Club assignment: Lavender and Lovage! Karen has a lovely blog filled with herbs, seasonal cooking, and fabulous photographs. Oddly, I've missed having to make crazy conversions from American to European measurements now that I'm back in the States, so I was thrilled that her measurements were in grams. Of course, then I proceeded to break out Bender's scale for measuring hops and measured everything in grams instead of converting. Ah, the wonder that is my mind.

These cookies were delightful. I have changed a few things up from the original recipe, but that had more to do with my lack of all-purpose flour  and a hankering for toffee than anything else!


I used this baking opportunity as an excuse to break out my Christmas presents! 


Jumbles: Chocolate Chip and Oatmeal Cookies
minimally adapted from Karen at Lavender and Lovage


Ingredients:
125g butter
75g caster sugar
75g soft brown sugar
1 large egg (beaten)
1 teaspoon vanilla extract
125g all purpose flour
50g self-rising flour
50g oats
50g chocolate chips and/or heath bits

Directions:
  1. Pre-heat oven to 375F. Grease and/or line two baking trays.
  2. Gently melt the butter in a large saucepan and then take off the heat and add both the sugars, mix well before adding the rest of the ingredients, stirring them well.
  3. Using a large spoon, scoop the mixture into small mounds on the prepared baking trays, making sure they are set well apart as they spread during baking.
  4. Bake in pre-heated oven for 10 to 15 minutes until JUST golden brown and just firm, they firm up a lot on cooling.
  5. Allow them to cool for 2 minutes on the tray before carefully transferring them to a wire rack to cool completely.
  6. Store in an airtight container for up to one week.


26 November 2012

November Secret Recipe Club: Herb Seasoning


The holidays are upon us (can someone please tell time to SLOW DOWN!), the days are getting shorter, and I'm in the mood for a quick meal when I get home from work at dark:thirty. The first evening after the time change Bender and I resorted to ordering pizza just so we could get home and stay there. Though we are no longer living in Germany, we still acted that way during the summer and did the grocery shopping one day at a time. November has taught us that those days are over and we are trying to plan in advance and do the shopping less often. It's only Sunday night and I've shopped through Thursday! (Please ignore the fact that I will be eating out Tuesday and Thursday.)

While searching for recipes to reduce the effort I need to spend in the kitchen during the holiday season, I came across a fabulous Herb Seasoning recipe on my Secret Recipe Club assignment for the month of November. Chocolate and Chilies is chock full of recipes I can't wait to get my hands on when I'm not quite so depressed about how short the days are (read: February when I finally start noticing the days getting longer). In the meantime, I'll stick to quick, easy, and flavorful. And what better way to quickly add flavor than an herb seasoning? You know I love spice rubs, and this herb seasoning will be the perfect counterpoint to the thick, heavy seasonings filled with chili powders. A nice palate cleanser, indeed!

If you don't go all wonky when the time changes and the days are super short (or even if you do!), head on over and check out the fabulously fun Chocolate and Chilies! The 15 Minute Creamy Avocado Pasta is on the calendar for Friday night when Bender's out.


Herb Seasoning
adapted from Chocolate and Chilies, originally from Get Cracking!!

2 tablespoons dried oregano
4 teaspoons dried basil
2 teaspoons garlic powder
2 teaspoons onion powder
1 teaspoon dried thyme leaves
3/4 teaspoons (or to taste) crushed red pepper flakes (optional)

Combine herbs and spices in a clean, dry, airtight jar. Shake away, my friend!

THOUGHTS:
Oh dear, I'm completely out of garlic powder and oregano now. Guess I'll be adding those to my shopping list! But that let that distract you from the herb seasoning. It's great with chicken, and I'll be trying it on pork chops tomorrow night! I'm also seriously thinking about adding it to a pasta with white sauce just to change that up a bit. I thought about adding salt, but held back because I enjoy salting my meat before adding other seasonings so I can control the added salt more easily. I did add some heat with the crushed red pepper flakes, and I think the author of a blog named Chocolate and Chilies can't be too disappointed with that addition!

VERDICT:
Yippee-a-change-from-the-same-old-spice-rub: 2 votes!


29 October 2012

October Secret Recipe Club: Roasted Broccoli

Hello October! Yesterday marked six years of marriage for Bender and me. We spent a lovely weekend in Chattanooga, catching all the big sights like Ruby Falls, Rock City, and the Tennessee Aquarium. If you're a big fan of turtles and jellyfish, you must see the Tennessee Aquarium: they have tons of both!


Ruby Falls, Chattanooga, TN


Have you seen Rock City? (Lookout Mountain, GA)

We returned home during the late afternoon and I set about making dinner. On the drive back I found the absolute perfect recipe to make from my assigned blog for Secret Recipe Club. We called our friend Goose to come join us, which automatically meant I would be serving Baconated Cheesy Chicken. Goose will eat a whopping two vegetables: broccoli and green beans. When I saw Roasted Broccoli on I Am a Honey Bee, I knew it was meant to be.

I Am a Honey Bee is a great site, full of recipes, crafts, restaurant, and city reviews. If you are looking for a restaurant in the Boston area, be sure to check out Nicole's reviews!

But back to that yummy, crunchy, spicy, Roasted Broccoli.

Raw broccoli on a bacon-greasy pan.


Roasted Broccoli
minimally adapted from I Am a Honey Bee

3 small broccoli crowns, cut into florets
1/2 tsp salt
1/2 tsp pepper
1/2 tsp red chile flakes (to taste)
1 tbsp olive oil
1 tbsp bacon grease

1. Preheat oven to 400F.
2. Toss together ingredients in a large bowl. Spread evenly on a baking sheet.
3. Bake for 15 minutes or until florets are browned and still retain a bite. Serve immediately.

THOUGHTS:
I've have roasted broccoli before, but this was the first time I felt like I nailed it. Yippee! For the bacon grease, I used leftover fat (and the pan so I got some crunchy brown bits too) from the bacon for the Baconated Cheesy Chicken. I roasted it alongside the chicken, for a low fuss, delicious, nutritious, side dish.

Nicole serves her roasted broccoli with fresh lemon juice. My gang tonight was not big on lemon, so I gave everyone the option to squeeze their own juice. No one took me up on it.

VERDICT:
Make-again: 3 votes

(Goose wanted me to let you know that he gives the dish 4.5 Geese out of a possible 5)

Nom nom nom.


24 September 2012

September Secret Recipe Club: Classic Foolproof Fudge


September is almost over. While I'm embracing fall completely, I'm going to the beach this weekend. Yep. That's right. I'm heading to the beach on Friday. Everyone else has made their summer vacations, but mine will start (and end) this weekend at the beach. It's why the recipe I chose for my Secret Recipe Club post fits perfectly this week!

I was assigned the blog Life and Kitchen, hosted by the fabulous Lindsay. Her blog is definitely for her fans, but it's mostly focused as a resource for her daughter when she grows older. Like a journal through the kitchen. Very fun.

Lindsay posted fudge earlier this month to say goodbye to summer, the beach, and vacation. I'm posting it to say hello. Though this recipe is ridiculously simple, I found myself playing the fool in this Classic Foolproof Fudge. That's right. I overcooked the chocolate. I used baking powder instead of baking soda. I used Kosher salt instead of table salt. And ya know what. It was still awesome. I managed to pull out about half of the baking powder and replace it with baking soda and the big flakes of salt actually improved the fudge and made it more of a salted chocolate. Awesome. So yes, this fudge is indeed, foolproof. 


Classic Foolproof Fudge
barely adapted from Lindsay at Life and Kitchen, originally from Cooks Illustrated

14 oz. can sweetened condensed milk
2 oz. unsweetened chocolate (chopped fine)*
16 oz. semisweet chocolate, chopped fine
1/2 teaspoon baking soda
1/8 teaspoon Kosher salt
1/8 teaspoon salt
1 tablespoon vanilla extract

Mix the chocolate with baking soda and salt. Add the sweetened condensed milk and vanilla. Melt the mixture in bowl over boiling water (or in double-boiler) until mostly melted. Stir frequently so as not to burn it. Take it off the heat and keep stirring until smooth. Pour into a greased baking pan and cool in the fridge for 2+ hours.

THOUGHTS:
*Okay, I need to tell you a story. A ganache story. The first time I made ganache I swore I'd never every make it again. I made ganache as an icing for Tabitha's birthday cake and painstakingly shaved every bit of chocolate. It took me two hours! Two hours! As I was complaining to her two days later (I couldn't complain about it the same day I served it to her!), she asked me why I used a knife instead of just throwing the chocolate into my food processor. I made up some excuse, probably saying I didn't want to dull the blades of my food processor. But honestly, it hadn't crossed my mind to use my mini food processor. The reason it took me so long is that I took the phrase "chopped finely" very seriously and made my chocolate pieces uber tiny. About a year later I had my mind blown when I watched a cooking show and saw someone actually make ganache. I don't remember who the host was, but their "chopped finely" in no way resembled my "chopped finely." Their pieces were way larger than the big Ghiradelli chocolate chips. Since then I have learned that chocolate will melt fairly easily, even if you don't get the pieces perfectly tiny. The moral of my story? Aim for chocolate chip size, but don't fret if your pieces are a little larger. 

As far as the recipe goes: Um, yes, please. I'll take more of that. Oh, and others too, yeah, they'll eat it!

VERDICT: 
Two-thumbs-up: 6 votes!


27 August 2012

August Secret Recipe Club: Bacon Chicken Alfredo Pasta

Bacon, cheese, tomatoes, pasta, and chicken. Did I mention the cheese sauce?


Hello August. Or should I say goodbye? You've come and go so quickly. Is it really the fourth Monday? It's a good thing I remember it was time to make my Secret Recipe Club pick last night!

I was tickled when I got my assignment this month! I was assigned Fantastical Sharing ofRecipes and she had me last month! Too fun! I perused her sight and was immediately drawn to her Bacon Chicken Alfredo Pasta. It doesn't hurt that I always put bacon in my alfredo! I did enjoy that she had a different take and make it into a cheddar and parmesan sauce instead of just a parmesan sauce! I added a twist and replaced the parmesan with asiago. Feel free to use your favorite tomato as well. My cherry tomato plant is between batches at the moment, and yesterday morning I found this guy. Grr. It's going to be a bit longer before I have new tomatoes.


This recipe looks complicated from its long ingredient list, but don't be discouraged. It's easy to make and delicious!

Bacon Chicken Alfredo Pasta

Ingredients:
2 chicken bone-in chicken breasts, baked at 400ºF for 45 minutes or until done (or leftover rotisserie chicken)
1 cup diced ham
1 tablespoon brown sugar
4 slices of your favorite bacon
1 tomato of your choice
1 crown of broccoli
8 ounces pasta of your choosing (elbow macaroni works well)
Shaved or grated parmesan cheese, for passing

Sauce:
1 cup milk
1 cup chicken broth (I make mine with water and chicken bouillon)
1 cup whipping cream
1 cup shredded white cheddar cheese
1 cup grated asiago cheese
2 tablespoons butter
2 tablespoons flour
¼ teaspoon garlic powder
¼ teaspoon onion powder
½ teaspoon red pepper flakes
½ teaspoon cracked black pepper
½ teaspoon salt

Directions:
From a cold skillet over medium heat, fry bacon until crispy (or your desired done-ness), place on paper towels to drain and set aside. Remove all but one teaspoon of bacon grease from the skillet and add diced ham. Sprinkle a tablespoon of brown sugar on top of the ham, and toss until the ham is golden and the brown sugar has caramelized. Remove ham from skillet and set aside. Add broccoli and saute quickly until brown on the edges. Chop or shred the chicken and chop the tomato. Set aside.

Over medium heat, melt 2 tablespoons butter. Add 2 tablespoons flour, salt, pepper, garlic, and onion powder and whisk together with the butter until bubbly. Continue whisking, and slowly add the milk, cream, and the chicken broth. Whisk constantly to prevent lumps. Continue whisking until the sauce has thickened. Turn heat to low, and add the grated cheddar and Parmesan cheese, one handful at a time, stirring constantly. Make sure the cheese is melted before your next addition. Once melted and mixed thorougly, turn your heat to the lowest temperature and cover. Prepare your pasta until al dente. Drain well.

Plate the pasta, and serve the sauce over the top. Crumble your bacon on top of the sauce, and also top with ham, broccoli, tomatoes and grated parmesan cheese.


You can choose to serve it all in one dish or as a pasta with customizable toppings. 


THOUGHTS:
My word I have a lot of dirty dishes! Next time I'll combine it all into one dish (minus the tomatoes) and serve it all mixed up to prevent the use of so many bowls! In the meantime, it was easy and delicious! The sugared ham was a nice foil to the broccoli and cheese. The tomatoes brightened things up and kept the dish from being too heavy. Overall, it was great!

I have a lot of leftovers, and I'm still debating what to do with them. I've combined everything into one dish (except the tomatoes of course) and am contemplating eating them cold for lunch tomorrow (yes, I like mac and cheese cold). OR I could put it in a baking dish, crumble more bacon on top with a bit more cheese and bake it for forty-five minutes at 350. One pot mac and cheese! Many thanks to Fantastical Sharing of Recipes for sharing this outstanding dish!

VERDICT:
Not-bad-and-very-filling: 1 vote*
Hey-that's-pretty-good: 1 vote


*Bender's vote changed the next day. Now it's more along the lines of Man-this-is-awesome-it's terrific-you-should-always-serve-it-all-mixed-up-after-the-sauce-has-thickened!

Yummy cheesy goodness!


Related Posts Plugin for WordPress, Blogger...